Save screenshot
Power Automate Desktop has several methods for dealing with error, such as debugging and block functions, but it is difficult to understand what kind of error it had when an error actually occurred.I think there is.
This time, I will explain how to save the screenshot of the entire screen.
"Get screenshot" action properties
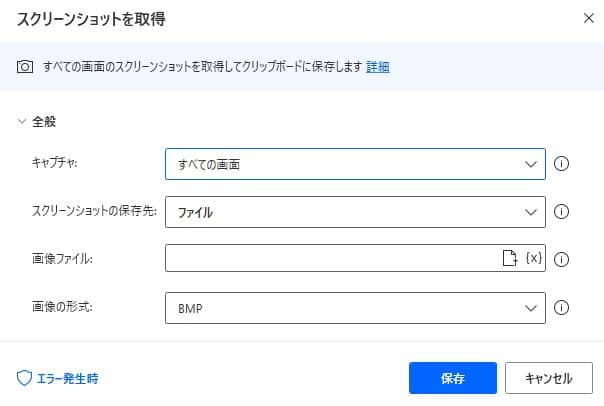
| Parameter name | value |
|---|---|
| Capture | Select whether to capture the entire screen or capture some windows |
| Save screenshot | Select whether to temporarily save on the clipboard or output as an image file |
| Image file | If "Screenshot Save" is set to "File", its saving directory |
| Image format | Image format (The initial value is BMP, but JPG is recommended because the file size is large) |
implemented with copy and paste
We have prepared a sample flow to store screenshots on the entire screen in the public folder of the public.
Copy the following code and paste it on the edit screen of Power Automate Desktop to add the target action.
Workstation.TakeScreenshot.TakeScreenshotAndSaveToFile File: $'''C:\\Users\\Public\\Pictures''' ImageFormat: System.ImageFormat.Jpg
Operate and implement Power Automate Desktop
- Enter "Acquire default printer" from "Search Action" and add action.
| Parameter name | value |
|---|---|
| Capture | All screens |
| Save screenshot | File |
| Image file | C:\users\Public\Pictures |
| Image format | JPG |
- When executed, the screenshot at the timing when the processing is executed is saved in the target folder.